Navigate to the Dialer Screen:
Click the

button at the top taskbar.
Purpose of the Dialer Screen:
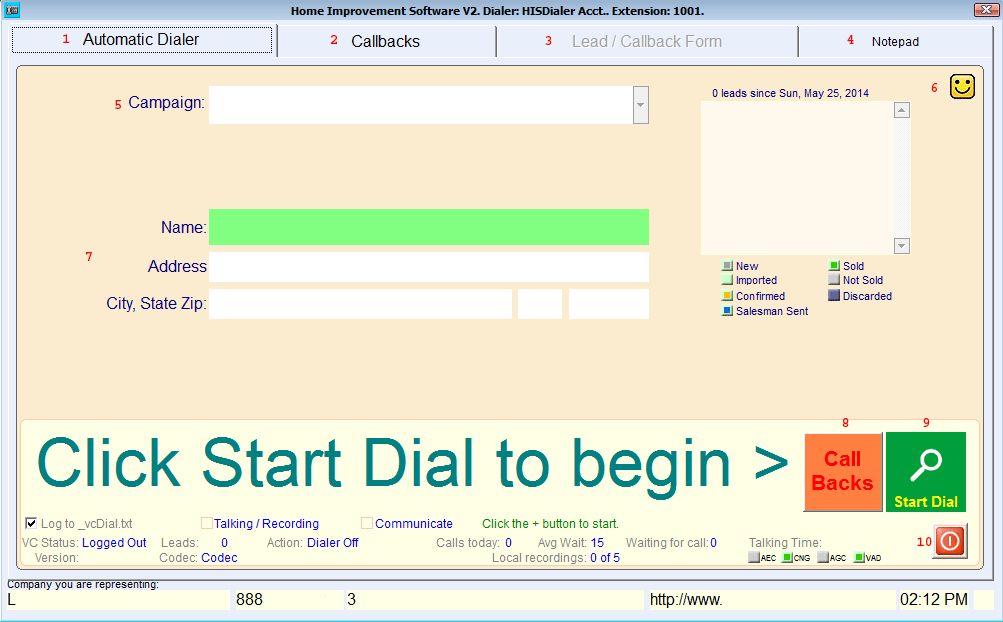
This screen is the Dialer screen that agents use to call the clients from the loaded list of client names and phones.
What you see in the Dialer Screen:
-
Automatic Dialer tab opens the main screen for the Automatic Dialer.
-
Callbacks tab allows the agent to go to his/her callbacks.
-
Lead / Callback Form is used during lead creation / editing.
-
Notepad allows the agent to save general notes if needed.
-
Campaign allows the agent to select the designated campaign to call from.
-
The smiley face allows the agent to hide the leads field that contains his leads and their status.
-
The Name, Address and City, State Zip fields contain the current clients information.
-
Call Backs allows the agent to go to his callback. It will turn red if there is callbacks due.
-
Start Dial allows the agent to start the dialing process.
How to use the Dialer Screen:
-
Lead Generation from the Automatic Dialer by the Agent.
-
-
Select the required campaign from the Campaign drop box menu.
-
Click on Click here to Start Dial that will appear directly below Campaign after the selection of the campaign to begin dialing.
-
Proceed to Phone Call Disposition by the Agent Screen.
-
Notepad Management by the Agent.
Click on Notepad.
-
Callbacks Management by the Agent.
-
-
Proceed to Callback management by the Agent Screen.
Purpose of the Phone Call Disposition by the Agent Screen:
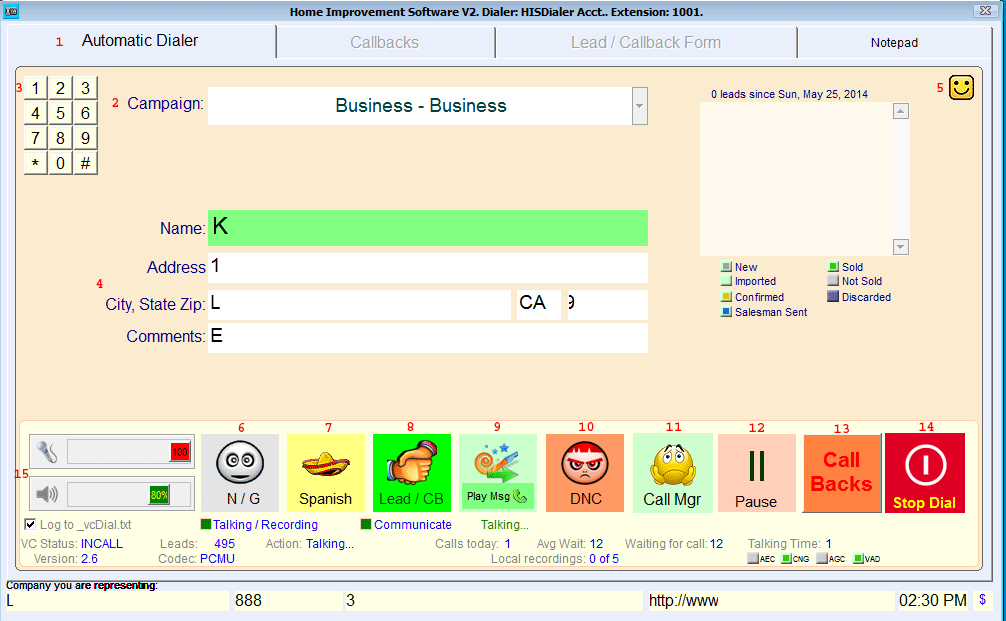
This screen is used by the agent during the disposition phase of the call. When the agent clicked Click here to Start Dial the dialer starts the dialing process. After 5-10 seconds the agent are connected to a potential client from the loaded listing (See dialer campaigns and listings). The agent will use this screen to disposition this call.
What you see in the Dialer Screen:
-
-
-
-
Current client information.
-
The smiley face allows the agent to hide the leads field that contains his leads and their status.
-
N/G - Not Good - lead disposition.
-
Spanish - Spanish speaking client lead disposition.
-
Lead / CB - lead/callback - potential good lead disposition.
-
-
DNC - Do not call list client disposition.
-
Call Mgr - allows the agent to notify his manager that he needs help.
-
Pause - allows the agent to pause the dialer for about 30 seconds.
-
Call Backs - takes the agent to his callbacks. This button background will turn red if there is callbacks due.
-
Stop Dial will stop the dialer and take the agent back to Automatic Dialer Screen.
-
Those fields allow the agent to control the sound and the microphone volume levels.
How to use the Dialer Screen:
-
Disposition a client according to the situation:
-
N/G - Not Good - This disposition is usually used to disposition disconnected, fax or business numbers.
-
Spanish - Disposition Spanish speaking clients here.
-
Lead / CB - This button disposition the lead to the lead/callback form where the agent can send the lead to validation or to his callbacks.
-
DNC - Disposition clients that you do not want to call again here.
Note: Call disposition via N/G, Spanish and DNC will disposition the current phone call to the selected disposition and the dialer will connect the agent with the next call.
Note: Disposition the current phone call as a Lead / CB will open the Lead/Callback Form.
Purpose of the Lead / Callback Screen:
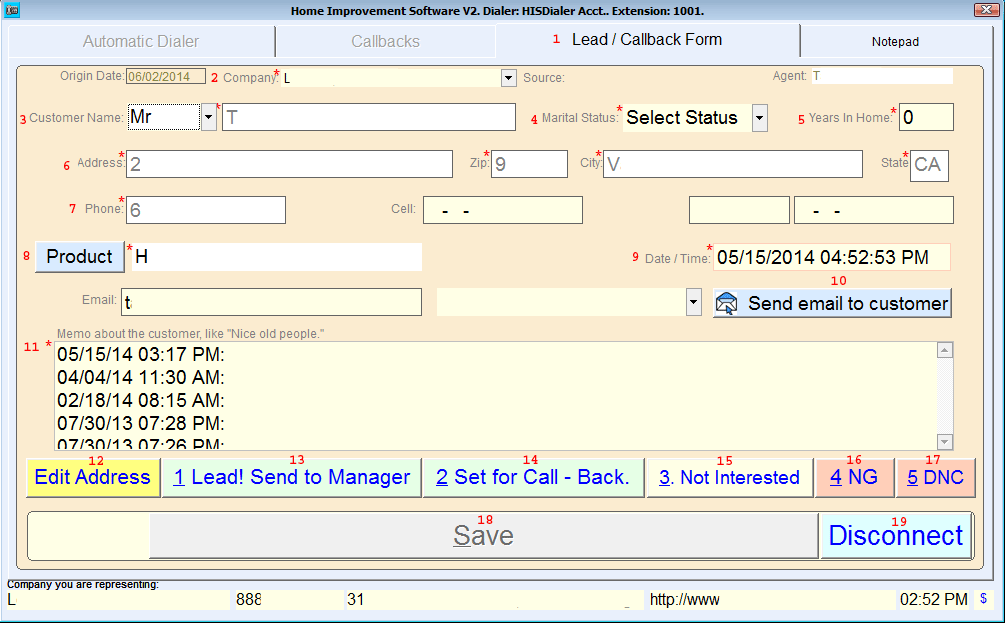
This screen is used to create and/or modify a lead.
The agent sees this screen when he clicks on Lead / CB at the disposition options at the Phone Call Disposition by the Agent Screen in the Dialer during the dialing process. This screen is also used to edit and disposition a callback lead from the agents callback window.
What you see in the Lead / Callback Screen:
-
-
Company selects the company.
-
-
-
-
Client address, zip, city and state fields.
-
-
Product opens the product list.
-
Date / Time opens the appointment date and time calendar.
-
Send email to customer - sends the email.
-
-
Edit Address allows the agent to edit the fields that are locked for editing.
-
Lead! Send to Manager is selected when the agent is ready to send the lead to
validation.
-
Set for Call - Back sends the lead to the agents callbacks.
-
Not Interested disposition the lead as not interested.
-
NG disposition the lead as not good.
-
DNC disposition the lead as do not call.
-
Save is the second stage of the lead disposition. It is used to confirm disposition
selection.
-
Disconnect allows the agent to disconnect the phone call.
How to use the Lead / Callback Screen:
-
Process a good lead and send it to validation (room manager).
-
Select the company by clicking on Company, if not already selected.
-
Select the marital status.
-
Fill the years in the house.
-
Double check clients information in fields 10 - 14. To change those fields click on Edit
Address, edit the information as necessary and click on Edit Address again to save changes.
-
Click on Product to select the relevant from the product list.
-
Select appointment date and time by clicking on Date /Time.
-
You can choose a pre-made template from a list of email templates and send it to the
client by clicking on Send email to client.
-
-
Click on 1 Lead! Send to Manager.
-
Save will turn into Its a Lead! Send to room manager, click on it.
-
The lead will appear in validation screen for the room manager to approve.
-
Process a potential lead and send it to callbacks
.
-
Click on Product to select the relevant from the product list.
-
Select appointment date and time by clicking on Date /Time.
-
-
Click on 2 Set for Call - Back.
-
Save will turn into Send to Callback, click on it.
-
The lead will appear in the Agents callbacks screen.
Purpose of the Callback management by the Agent Screen:
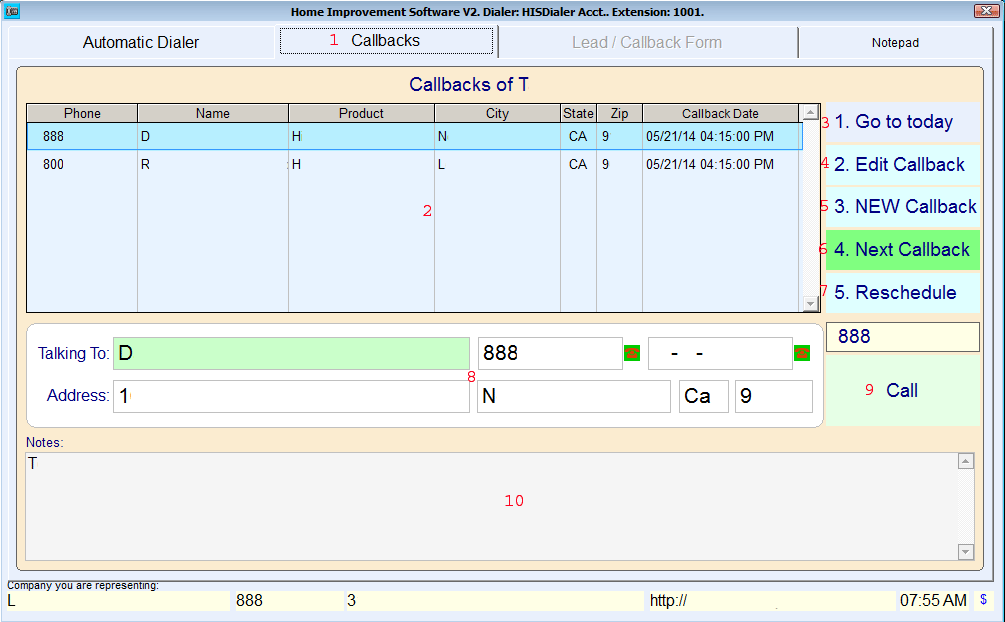
This screen is used by the agent to manage his callbacks. The agent can add a new callback, modify an existing one and call callback clients from this screen.
What you see in the Callback management by the Agent Screen:
-
-
-
Go to today will select today's callbacks in the callbacks list.
-
Edit Callback will edit the selected callback.
-
New Callback creates a new callback for the agent.
-
Next Callback moves the callback selection to the next callback.
-
Reschedule allows the agent to reschedule the callback to 24 hrs from the time the agent pressed on reschedule.
-
Call allows the agent to call callback clients manually.
Note: You can type a phone number manually in the field above the Call to Call that number.
How to use the Callback management by the Agent Screen:
-
-
-
Make the necessary changes. To edit gray fields click once on Edit Address, edit the information and click on Edit Address again to save the changes.
-
Disposition the call. Select one of the available disposition options and confirm disposition.
-
Note: Read more in the Lead / Callback Screen.
-
Manually create a new callback.
-
-
-
Type in the clients information. The fields marked with * are required.
-
Click on Product to select the relevant from the product list.
-
Select appointment date and time by clicking on Date /Time.
-
-
Click on 2 Set for Call- Back.
-
Save will turn into Send to Callback, click on it.
-
The lead will appear in the Agent's callbacks screen.


